Sunday, July 31, 2011

German Chocolate Cake Truffles

So, you’ve leveled and carved your cake.  What do you do with all the scraps?  It’s practically a crime to throw away perfectly good cake, right?  This is an idea I kept seeing on various websites and decided to give it a try.

Cake truffles are very easy to make, but I’ve had nothing but rave reviews from everyone who’s tried them. 

crumbled cake

1. Crumble cake scraps into a large bowl. For this batch, I had about 8 cups.


ready to shape into balls

2. Use your hands to mix in about ½ cup frosting. You want the mixture to be just moist enough to hold together.  If you add too much frosting, you’ll end up with soggy truffles.


chilled and ready to
dip in chocolate

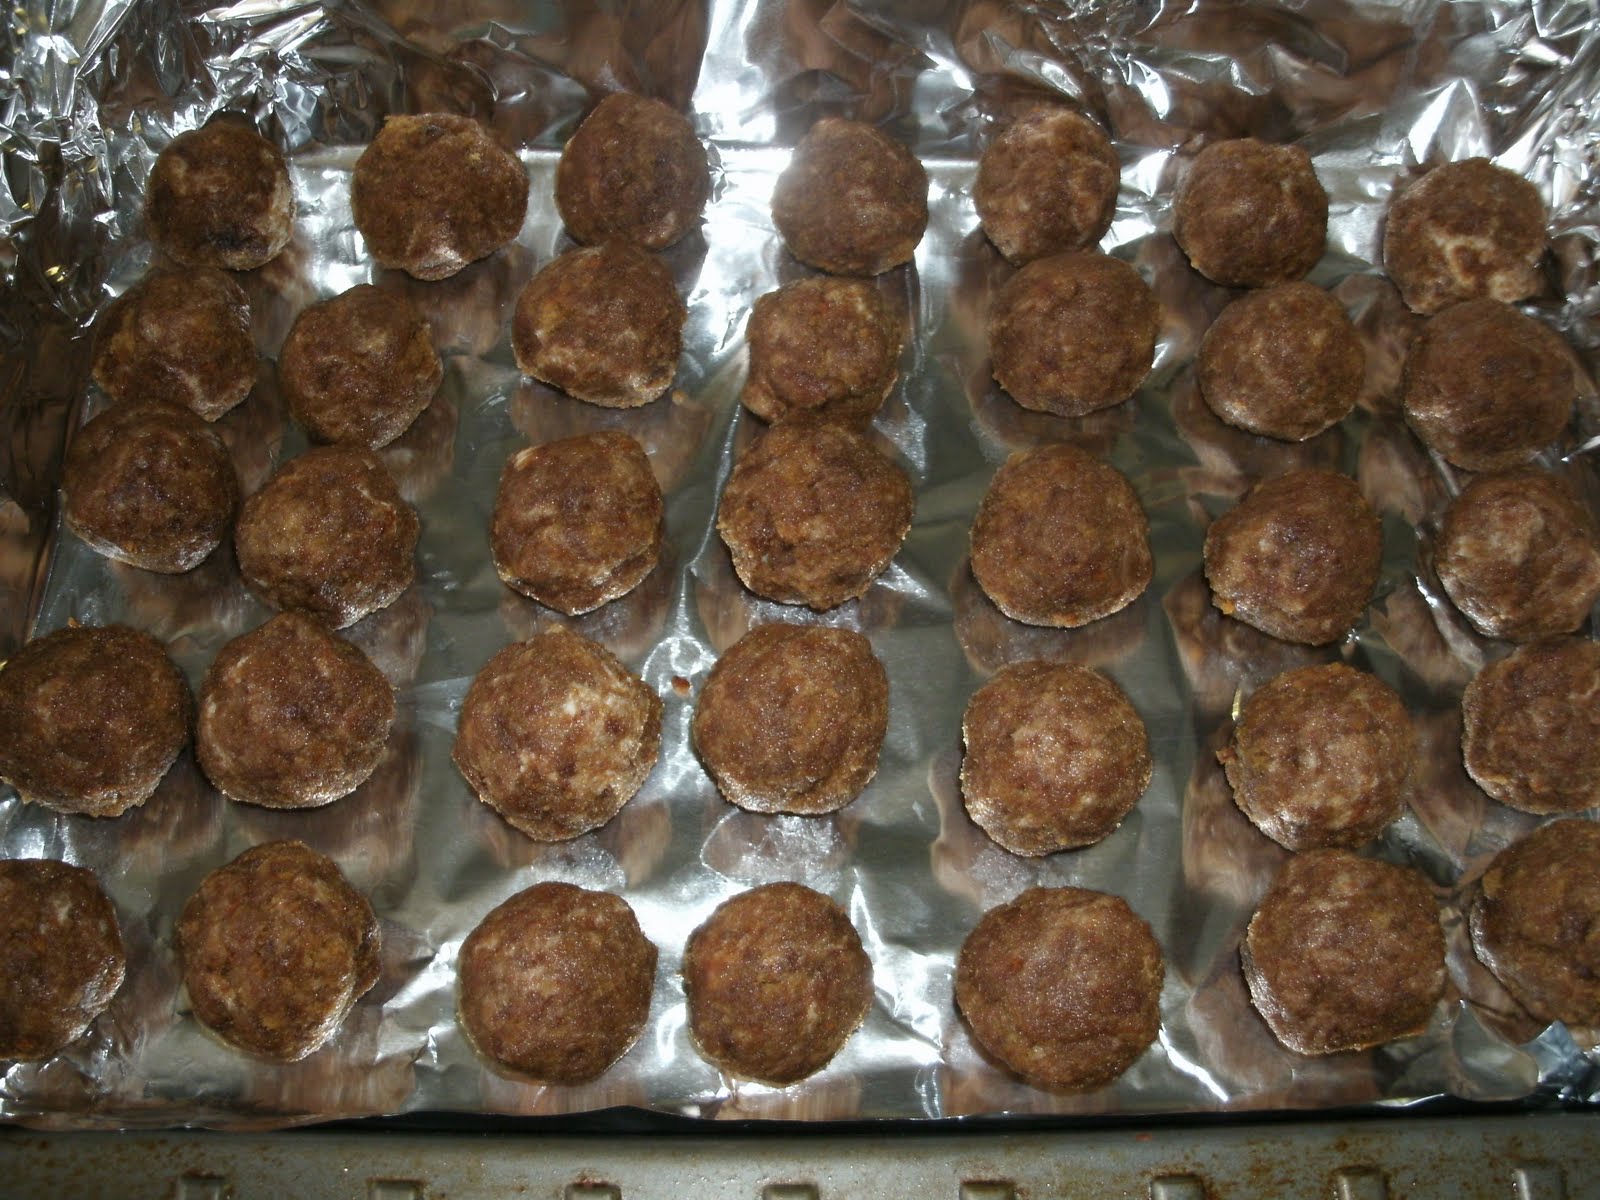
3. Scoop up a heaping spoonful of the cake and frosting mixture and form into a ball with your hands. I line up the truffles on a foil-lined cookie sheet.

4. Chill truffles until firm, about 2-3 hours.


I use a toothpick to dip
the truffle in the melted
chocolate
5. Dip truffles into melted candy coating and place back on foil-lined cookie sheet.  Once firm, cover and store truffles in a cool, dry place.

This batch of truffles is German chocolate cake with coconut-pecan frosting.  Before the candy coating set, I decorated the truffles with a sprinkle of coconut and chopped pecans.

This was my first time making the cooked coconut-pecan frosting.  The first recipe I tried, using 3 whole eggs, was less than successful.  Apparently, my stirring skills were somewhat lacking and I ended up with little bits of hard cooked egg whites in the frosting – not particularly appetizing.  My second attempt, using three egg yolks, was much better, thus saving my baking reputation.


Coconut-Pecan Frosting

1 c sugar
1 c evaporated milk
1/2 c butter
3 egg yolks, lightly beaten
1 t vanilla
1 1/3 c flaked coconut
1 c chopped pecans

In a saucepan, combine sugar, evaporated milk, butter, and vanilla.  Cook over medium heat, stirring frequently, until mixture thickens, about 12 minutes.  Remove from heat and stir in coconut and pecans.  Once frosting has cooled to room temperature, spread on cake (or mix with cake crumbs to make truffles).

Wednesday, July 27, 2011

Nutella Love

So, it turns out February 5 is World Nutella Day.  How on earth did I not know that? There’s a website and everything. Next year I’ll definitely be prepared to celebrate this important occasion properly. In the meantime, it certainly wouldn’t hurt to get in some early preparation. 

Inspired by the pages and pages of Nutella recipes posted online, I decided to play with one of my favorite recipes, butterscotch blondies. Instead of adding chocolate chunks, I swirled spoonfuls of Nutella into the batter.

Yum.  I have a feeling there will be more Nutella experiments in the future.

Butterscotch Blondies with Nutella Swirls (adapted from Best-Ever Brownies)

½ c unsalted butter
1 c light brown sugar
1 egg
1 t vanilla
1 c flour
1 t baking powder
¼ t salt
4 T Nutella

Preheat oven to 350°F. Butter and grease an 8-inch square baking pan.

Cut butter into small chunks and place in saucepan over medium heat. When the butter is melted, add the brown sugar.  Stir and cook for about 1 minute, until mixture starts bubbling.

Cool for about 10 minutes, until lukewarm.

Beat egg and stir into sugar mixture with vanilla.

ready for the flour mixture

Add flour, baking powder, and salt and stir just until mixture is combined.
almost done


Spread batter into prepared pan.  Drop Nutella by the spoonful into the pan.
okay, maybe I used a little
more than 4T of Nutella

this is the fun part
Use a knife to swirl Nutella into the batter. 

Bake for 25 to 30 minutes until a toothpick inserted in the center comes out clean.
fresh from the oven

The good news is that you don’t have to wait for the blondies to cool completely.  They taste great warm.

Sunday, July 24, 2011

More Theater Cakes

Okay, confession time. Once in a great while, life demands the use of a cake mix.

I know, I know, but stick with me here. When using a prepared mix, I always like to play with flavor combinations. (You didn't think I just added water and eggs, did you?) Pumpkin chocolate chip is one of my favorite last-minute recipes. And it all starts with a yellow cake mix. Cinnamon-brown sugar cream cheese filling complements this cake nicely.
the woods
Jack's cow. . .


The Into the Woods cake was for my “nephew” and “niece.” The woods part of the cake was a given, but it needed something more.

I read about this fairy tale character-filled show and discovered that two of the main characters were on a quest to find “the cow as white as milk, the cape as red as blood, the hair as yellow as corn, and the slipper as pure as gold.” There was my something extra.

. . .Cinderella's slipper, Rapunzel's hair,
and Red Riding Hood's cape
The “Enchanted April” cake was to celebrate my niece’s fabulous performance last fall. In the play, four very different women answer a newspaper ad offering “sunshine and wisteria” at a seaside Italian villa for rent during the month of April.

I hand painted fondant applied to the side of the cake to make the villa and grounds and created the sea with blue, green, and white buttercream around the bottom of the cake. The rest of the cake I decorated with wisteria.


Pumpkin Chocolate Chip Cake (adapted from Cupcake Fun)

1 (18.25 oz) yellow cake mix
½ t nutmeg (I prefer freshly grated)
½ t cinnamon
1 ¼ c water
2 T vegetable oil
3 eggs
¾ c canned pumpkin
6 oz (half a package) mini chocolate chips

Preheat oven to 350°F and grease and flour two 8-inch cake pans.

Combine cake mix, nutmeg, and cinnamon in a large bowl. Add water, oil, and eggs and beat for two minutes with an electric mixer. Add pumpkin and mix until well incorporated. Stir in chocolate chips.

Pour batter into prepared cake pans and bake 30-35 minutes. Cakes are done when a toothpick inserted in the center comes out clean.

Cinnamon-Brown Sugar Cream Cheese Filling

8 oz package cream cheese, softened
½ c confectioners’ sugar
½ t cinnamon
1 t brown sugar
¼ c milk

In a large bowl, combine all ingredients with an electric mixer until well combined and fluffy.

Thursday, July 21, 2011

Chocolate Muffins

Yes, it’s a million degrees outside (I have a special thermometer) and yes, it’s been a long week and I’m tired, but that little voice in my head still called, “bake something.” 

I searched the Internet and found a site called Cacaoweb.  Suddenly, I was feeling a little more energetic.

going into the oven
The chocolate muffin recipe looked quick and easy, so I tweaked it a bit and headed to the kitchen. This will be a perfect Friday morning treat for my coworkers.

awaiting the final touch
The recipe called for a 350°F oven, which I followed, but the muffins didn’t puff up as much as I would have liked.  I’d suggest baking the muffins in a 400°F oven. To make the muffins a little special, I added a drizzle of vanilla glaze and a freeze dried strawberry.


Chocolate Muffins (adapted from Cacaoweb)

2 eggs
1 cup sugar
1 cup flour
7 T unsweetened cocoa powder
2 t baking powder
½ t salt
1 teaspoon vanilla extract
2/3 c milk

2/3 c butter, melted
2/3 c mini chocolate chips


Preheat oven to 400°F and line 12-14 muffin cups.

Beat the eggs and sugar together.  Add flour, cocoa powder, baking powder, salt, vanilla, and milk. Mix until incorporated. Slowly stir in melted butter, then chocolate chips.

Bake about 15 minutes, until a wooden toothpick inserted in a muffin comes out clean.

Enjoy!

can't wait for breakfast!

Tuesday, July 19, 2011

First Wedding Cake

Happy Anniversary, Beth and Egon!

I can’t believe that it was nine years ago that my sister and almost brother-in-law came to Baltimore to talk wedding cake. I had pulled a bunch of pictures I thought they’d like to give us a starting point for deciding on a design. Their reply was something along the lines of “We like where you’re going with this and will leave it up to you.” Oh, the pressure.

I remember the panic setting in after they left. Creating an actual wedding cake for a couple hundred people?! What was I thinking?  I had only ever baked for my family.

To distract myself, I turned on the TV. Believe it or not, there was the fabulous Martha Stewart, showing her viewers how simple it was to create a tiered wedding cake. I took this as a sign from the almighty pastry gods that everything would be okay.

I stocked up on tropical fruits
to use as models and started
shaping the marzipan.
Many ideas and sketches and recipe tests later, I decided to make a lemon sponge cake with raspberry filling and vanilla frosting.  As for the design, I had to keep in mind that this cake needed to travel well.  (I was going to assemble the cake in Ocean Pines, MD and set it up in Dewey Beach, DE.)  My inspiration came from another Martha Stewart episode where she shaped marzipan into various fruit shapes.  I decided to go tropical.

After the marzipan dried,
I started layering colors
to create star fruit, papaya,
pineapple, mango, etc.
The day before the wedding, I assembled the cake layers in the kitchen and my brother-in-law’s cousin created corsages and bouquets a few feet away in the living room.  The next morning, my brother-in-law, his dad, and I headed to the site of the reception to set up the cake and centerpieces.  Seeing his well over 6-foot tall FBI agent dad help me arrange fluffy, white layers of cake just so must have been quite the sight. We did a good job, though. Everyone seemed to enjoy my very first wedding cake.


Lemon Sponge Cake adapted from Cakes & Cake Decorating

1 c. flour
1 t baking powder
½ c butter, softened
½ c sugar
2 eggs
zest of 2 lemons

Preheat oven to 325°F. Grease and flour 8-inch round cake pan.

Into a large bowl, sift flour and baking powder.  Add butter, sugar, eggs, and lemon zest.

Mix ingredients by hand for 2 to 3 minutes.  Mixture should be slightly glossy.

Pour batter into prepared pan and bake for 20 to 30 minutes.  The cake is done when a toothpick inserted in the center comes out clean.

Cool completely on a wire rack. This recipe can easily be doubled (tripled or quadrupled).

Sunday, July 17, 2011

drinkin' & bakin'

So there I was, perusing the selection of cookbooks at the library again and a title jumped out at me.  How did I miss this one?  The Boozy Baker by Lucy Baker (yup, that’s her real name) is now on my ever increasing “must buy” list.

I’m quite the lightweight drinker, but alcohol in dessert is definitely something I can handle. The book is filled with great cake, cookie, and dessert ideas, like champagne layer cake, margarita meringue pie, chocolate pots de booze, and bourbon apple crisp.  Where to begin?

To start, I played around with the Cuba Libre Brownies recipe. Chocolate, lime, and rum – YUM!  The Cuba Libre drink is a mix of light rum, cola, and lime juice.  I love the chocolate and lime combination, so I went a little heavier on the lime than the original recipe. Although I prefer a dense, chewy brownie, this cake-like treat was the perfect, light summer dessert.


Cuba Libre Brownies, adapted from The Boozy Baker

Brownies                                                         
1 ½ c all-purpose flour                                      
1 t baking soda                                                       
1 t salt                                                                      
finely grated zest of 2 limes                                 
10 oz bittersweet chocolate, chopped                
½ lb. unsalted butter, softened                         
1 c sugar
3 eggs
¾ c cola
¼ c white rum

Frosting
¼ pound butter, softened
3 T cocoa powder
2 T white rum
juice of 1 lime
2 T cola
4 c confectioners’ sugar

            Place oven rack in bottom third of the oven and preheat to 350°. Grease and flour a 13 x 9-inch baking pan. Set aside.

Brownies:
            In a medium bowl, combine flour, baking soda, salt, and lime zest.

Slowly melt chopped chocolate in microwave at 50% power. Start with 30-second increments and stir between each increment. As the chocolate melts, decrease to 10-second increments until chocolate is completely melted.

In a large bowl, beat butter and sugar with electric mixer about three minutes, until fluffy. Add the eggs, one by one, making sure to incorporate well. Add melted chocolate and mix well.

right out of the oven
Add flour mixture and gently stir by hand, just until combined. Add cola and rum, again stirring by hand just until combined, and pour batter into prepared pan.

Bake approximately 35 minutes, until toothpick inserted in center comes out clean.  Let brownies cool completely in pan.

Frosting:
            Add lime juice to measuring cup and add enough light rum to equal 1/3 c. In a large bowl, combine butter, cocoa powder and rum mixture with an electric mixer. Slowly incorporate confectioners’ sugar, one cup at a time.

Spread frosting over cooled brownies.  If desired, sprinkle with additional grated lime zest. Cut into 24 squares.

I also tried the Black and White Russian cookies.  Kahlua and espresso powder made a unique and oh-so tasty twist to the classic recipe.
on the cooling rack
black & white goodness

Wednesday, July 13, 2011

Emily the Strange

Emily's guitar
Making cakes for Emily is always fun.  I get to delve into mysterious worlds and learn new things. For instance, I knew nothing about Emily the Strange before making this cake.  A 13-year-old girl who walks to the beat of her own drum – well, guitar actually, Emily the Strange is a counterculture figure with a sharp wit and a gang of four black cats.  She hates pink and insists on being herself, thinking for herself, and doing it herself. 
creating this dark,
fantastic look was a fun
change from the
usual pretty cakes
I explored a bunch of websites and created some decorations for the sides of the cake based on Emily the Strange’s art. Black and white with a bit of red was obviously the way to go with colors.  Emily and her family ordered the cake to celebrate her graduation, so I gave Emily the Strange a graduation cap and showed her studying her two favorite subjects, math and science. 
a side view


* * * * * * * * * * * * * * * * * * * * * * * * * * *
For a recent birthday, Emily attended the Snow Ball in Michigan and met author Heather Brewer (of The Chronicles of Vladimir Tod series).  The border around the cake was based on the header of Heather Brewer’s website.  The cemetery scene looks simple, but it took FOREVER!  Only after spending hours twisting my hand, head, arm, and entire body all over my kitchen counter to cut black fondant, did I learn about X-acto knives with pivoting heads.  Oh well, I’ll know that for next time. 

Also, I don’t have an airbrush (one day), so I used spray cans of pink, blue, and purple food coloring to tint the frosted cake.  To avoid spraying my entire kitchen (I hate cleaning), I put the cake on a lazy Susan and placed it inside a new cardboard box with one side cut off.  I sprayed and spun the cake and only the inside of the box was a mess.
On the cover of all the books, Vladimir, the half-human, half-vampire, always wears a fanged smiley face tee, so I made a few to dangle from wires on the cake.

Saturday, July 9, 2011

Seussical the Musical

To continue with the theater cakes theme, I created the Seussical cake for my “niece.” How could a cake based on Dr. Seuss’s books not be fun?

I decided to start with the Cat in the Hat’s red and white striped hat.  He’s the narrator of the show, so it seemed fitting.  Also, the hat would give me a sturdy base and I was traveling to Lancaster, PA.  I had read that the stage for the Broadway show was lit with colored circles, like in the book “Oh, the Places You’ll Go.”  That got me thinking about a multi-colored cake.  I browsed through Cake Central (a great website for inspiration) and found a recipe for a rainbow cake.  Perfect – I did a round layer each of lemon, orange, and lime.  This would be a Seuss-ish cake inside and out.

Gertrude loves Horton
a teeny, tiny Who
Horton (with his clover) and Gertrude McFuzz are two main characters, so I created a Jungle of Nool coming out of the hat and placed them there. Jojo the Who is another main character.  Since a Who would be much too small to see next to Horton, I placed Jojo at the bottom of the cake.  For my “niece,” who played a Bird Girl and wore a hot pink feather boa, I added some feathers around the hat.
almost done
adding shading to the cake with a black
food coloring pen was the finishing touch

Follow Me on Pinterest